


Digital certificates lie at the heart of Public Key Infrastructure (PKI) security technologies such as encrypted email, document signing, VPN access, server SSL authentication, and software code signing. Certificates are a vital part of PKI because they provide a means to establish the ownership of an encryption key.
If you have someone else’s public key, then you can send them an encrypted message that only they can decrypt with their private key. You can also verify someone else’s identity by using their public key to decrypt something that could only have been encrypted with their private key.
Certificates are typically issued by Certificate Authorities (CAs), which are trusted third parties whose root certificates (containing their public keys) are bundled in all popular web browsers . A certificate issued by a CA states that something is true, and is digitally signed with the CA’s private key. Since every browser has the CA’s public key, it can use that to verify that the certificate really was issued by the CA in question. Then it simply comes down to a matter of trust: Do you trust the reputation of the CA, and therefore do you believe that what the CA certifies to be true really is true?
Established CAs such as VeriSign have good reputations, and for that reason they can charge for the certificates they issue. In fact they charge a range of prices for certificates, based on the length of keys that are employed and the amount of effort they put into verifying that the information they are certifying is correct. For example, a basic VeriSign SSL certificate valid for one year costs $399, while an Extended Validation certificate which requires more extensive fact checks costs $1499 for one year.
But if your organization runs a secure web server that’s only used by employees, or if you encrypt email sent between employees, or if you use digital certificates to authenticate employees onto the corporate VPN, then there’s really no need to pay a CA for certificates at all. That’s because you can act as your own CA and issue your own digital certificates for internal corporate use.
The benefit to rolling your own certificates is that you can issue as many certificates as you like for free, although you do have to factor in potential CA software licensing fees, plus the cost of the server hardware used to run the software. You’ll need to keep your CA private key secure to prevent hackers from using it to issue fraudulent certificates , but this is arguably no riskier than relying on a third party CA to keep its private key secure (as the Diginotar debacle proved).
So what happens when a web browser encounters a certificate issued by your company? Normally, it would alert the user that the certificate has not been issued by one of the trusted CAs whose root certificates are bundled with the browser. To avoid this alert, you’ll need to equip your employees’ browsers with your organization’s root certificate, which is easy to do. What you can’t do is put your CA root certificate into the browsers of people outside your organization – and that’s why certificates issued by your organization are only really useful for internal corporate use.
How to issue your organization’s own digital certificates
There are many packages around for different operating system environments, including OpenSSL (multi-platform) and Keychain Assistant (part of OS X.) (An article on Enterprise Networking Planet explains how to set up your own CA using OpennSSL as part of a VPN implementation.) For the purposes of this guide we will use SimpleAuthority, a GUI -driven application which is available for Linux, Windows and OS X. The software is free for up to 4 users, $50 for up to 50 users, and $860 for 50 or more users.
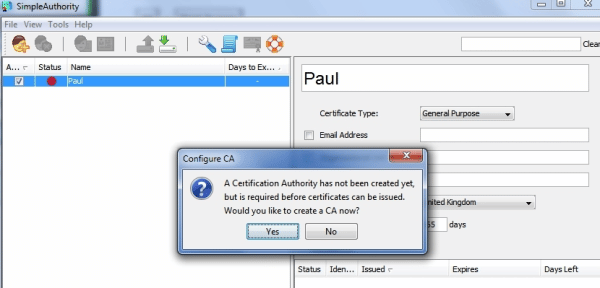
Software that issues certificates needs to be secure, so it is highly recommended you install SimpleAuthority on a dedicated server. Once SimpleAuthority has been installed, the first thing you’ll be asked to do before you can issue any certificates is create a new Certificate Authority. Click Yes to create a new CA.
Next, fill in the details such as the CA’s name (probably the name of your organization) and the expiry date of your CA. Ten years is a good default term.
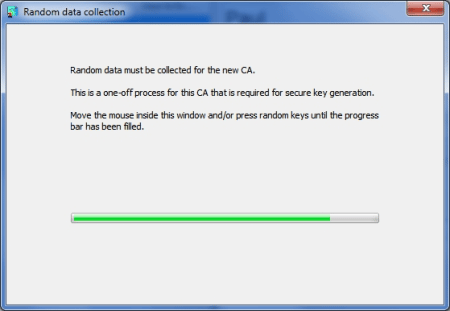
You’ll now need to add some entropy into the system by moving your mouse or pressing keys until the software has enough “randomness” to generate the keys for the CA certificate. You’ll also be asked for a master password to protect the CA certificate. Be sure to choose a strong password as the CA certificate needs to be highly secure.
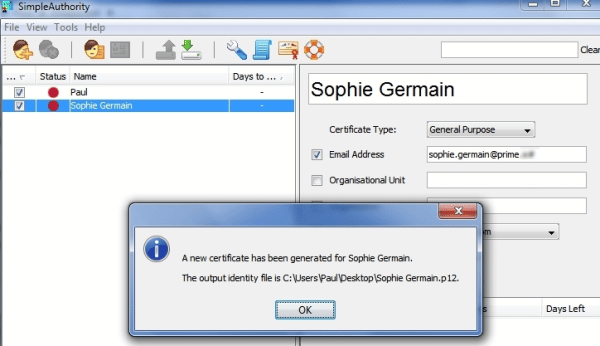
SimpleAuthority works with the concept of users, to whom certificates are issued. A user can be a person or a server. To enroll a new user and create a certificate, click on the New User icon at the top left hand side of the application, or select File-New User. Then fill in the user’s name, select General Purpose (for a person) or SSL Server (for a server) from the Certificate Type drop down box, and add an email address and other information if you wish. Select a validity period (usually 365 days), and click New Certificate at the bottom of the screen.
Next, export all your certificates to a folder for distribution to end-users or servers by going to the Tools menu and choosing Export – Latest Certificates.
Importing your CA root certificate into users’ browsers
To avoid presenting users with a warning every time they encounter one of your organization’s certificates, you need to import your CA certificate into their browsers. To do this you’ll first need to export the CA certificate from Simple Authority by selecting Tools – Export – CA Certificate. The certificate can then be distributed to individual users.
To import the CA certificate into Internet Explorer on a user’s machine:
- Select Tools – Internet Options
- Click the Contents tab, and then Certificates
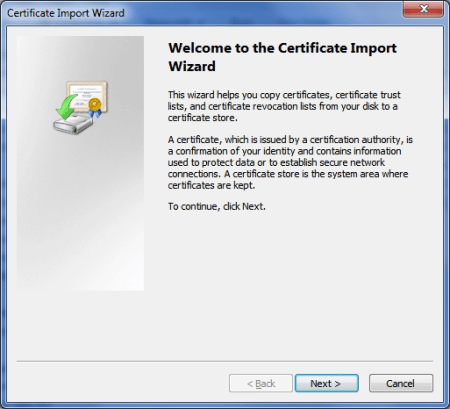
- Click the Trusted Root Certification authorities tab, and the Import… button so that the Certificate Import Wizard starts.
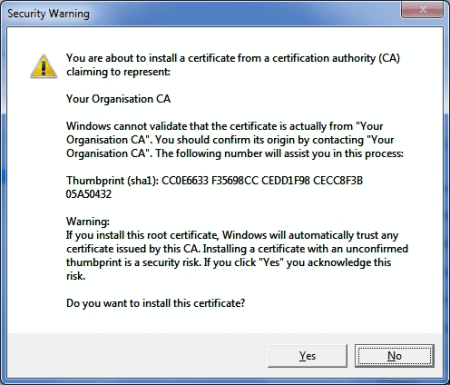
Next, select the certificate and allow Windows to select the correct certificate store, and click finish. A security warning will appear to alert you that you are about to install a CA certificate. Click Yes to install the certificate anyway.
Your CA certificate will now appear in Internet Explorer’s Trusted Root Certification Authorities lists:

In Mozilla Firefox, you’ll need to go to Tools – Options and then click the Advanced and then the Encryption tabs. Then click View Certificates, and finally click Import to select and import your CA certificate.
Once your CA root certificate is installed in user browsers, you can then use the certificates you issue just as you would commercially available certificates – but without the associated costs.
Paul Rubens is an award-winning technology journalist who has been covering IT security for over 20 years. He has written for leading international publications including The Economist, The Times, The Financial Times, The Guardian, the BBC, and Computing.