


Does your network use the 802.1X port-based access method for authentication on the wired and/or wireless side? If so, you know it takes a bit more than just plugging into an Ethernet port or entering an encryption key to connect to the network. On each client, you must configure the smart card, certificate, or PEAP settings, usually in addition to settings for IPsec or WPA/WP2 encryption.
In this tutorial, we’ll first see how to securely set the 802.1X settings to prevent man-in-the-middle attacks. Then we’ll review the new advanced settings for 802.1X in Windows 7. Plus we’ll review two other tips: enabling 802.1X for wired networks and removing cached login credentials.
Securing your 802.1X settings
One potential way for a hacker to capture a client’s network credentials and/or access to the client is to pose as an authentication server. If the client’s 802.1X settings for the server-side of the authentication are lenient, the client could potentially “trust” the bogus authentication server. However, there are a few features that you can take advantage of to help prevent this type of attack.
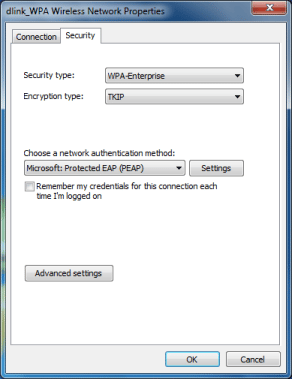
Figure 1.
The settings we’re going to talk about are the main Smart Card, Certificate, or PEAP settings. To bring these up for a wireless network, open its profile or properties dialog, select the Security tab (see Figure 1, above), and click the Settings button for the desired authentication method. For a wired network, go to the network connection properties, select the Authentication tab (see Figure 2, below), and click the Settings button for the desired authentication method.
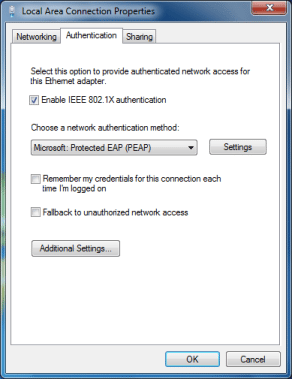
Figure 2.
Figure 3 (below) shows an example of the PEAP settings.
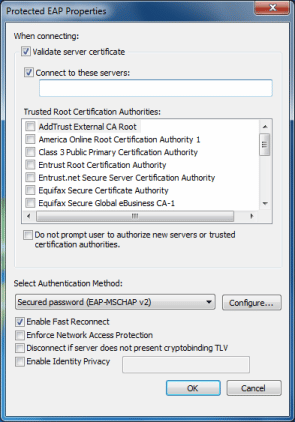
Figure 3.
First, make sure the client authenticates the server before letting the server authenticate it. To do this, mark the first checkbox, Validate server certificate. Then select the Certificate Authority (CA) that the server’s certificate uses from the list box. If you purchased an SSL certificate, Windows should have the CA loaded already. However, if you created your own self-signed certificate for the authentication server, you have to import the CA certificate into the Trusted Root Certification Authorities store of Windows.
Second, specify the addresses for the network’s authentication server(s), so the client will only communicate with those listed. Mark the second checkbox, Connect to these servers, and enter the domain(s) separating each server name with a semicolon. For example, auth1.yourdomain.com; auth2.yourdomain.com.
Third, prevent users from accepting new or untrusted servers. Normally, users are prompted to accept or reject authentication servers that aren’t using a CA you specify or aren’t from an address you’ve inputted. This might be fine for administrators, but regular users might be confused and unknowingly accept a connection to a phony server and network. Therefore, you should mark the Do not prompt user to authorize new servers or trusted certification authorities option to automatically reject these “unknown” servers.
Utilizing the new 802.1X settings in Windows 7
Microsoft introduced advanced settings for 802.1X in the Group Policy settings of Windows Vista. However, now they’ve moved most of those settings to the GUI in Windows 7. The Security tab on the Wireless Network Properties dialog (see Figure 1) and Authentication tab on the Local Area Connection Properties dialog (see Figure 2) now have an Advanced Settings button. This brings up the 802.1X Advanced Settings dialog, such as Figure 4 shows.
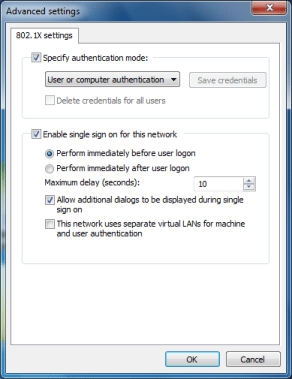
Figure 4.
The first section lets you specify the authentication mode and login credentials. You can select User, Computer, or Guest authentication. If you aren’t sure which one to choose or the network supports both, you can select the User or Computer option. If using User authentication, you can click the Save Credentials button to input the username and password. On the flipside, you can remove saved credentials by marking the checkbox.
The second section of the dialog is where you can enable and configure single sign-on for the network. If the system and network are set up properly, using this feature eliminates the need to provide separate login credentials. Instead of having to input a username and password during the 802.1X authentication, it uses the Windows account credentials. Single sign-on (SSO) features save time for both users and administrators and help to create an overall more secure network.
Enabling 802.1X for wired networks
Though 802.1X was primarily developed for Wi-Fi authentication, it can also be useful on the wired side too if your switches and network support it. However, 802.1X isn’t automatically enabled for wired connections in Windows XP SP3, Vista, and 7. You must manually enable the Wired AutoConfig service of Windows in these particular Windows versions. This is the service that manages the port-based authentication on Ethernet interfaces.
Here’s how to enable the Wired AutoConfig service:
1. Type services.msc into the Run prompt of XP or the start menu search field of Windows Vista or 7.
2. Find and double-click the Wired AutoConfig service.
3. Click the Start button.
4. To make it automatically start at boot, choose Automatic for the Start Type option.
Now you’ll find the Authentication tab on the Properties dialog for wired network connections, such as Figure 2 showed.
Removing the cached login credentials
By default, Windows XP saves the username and password you use for 802.1X authentication so you don’t have to enter it every time you connect to the network. However, this isn’t the most secure scenario. Plus it’s a problem when multiple people are using the same computer and each has their own 802.1X credentials.
To remove the cached login credentials in XP, you must (carefully) modify the Windows Registry by deleting the following key:
HKEY_CURRENT_USERSoftwareMicrosoftEapolUserEapInfo
You can also delete the saved 802.1X login credentials in Windows Vista and 7. Fortunately, it doesn’t take a Registry edit. You just have to deselect a checkbox on the Properties dialog of the Network Connection. In Vista, it’s the Cache user information for subsequent connections option and in Windows 7 it’s the Remember my credentials for this connection each time I’m logged on option, such as you saw in Figures 1 and 2.
You can use other supplicants
The settings and interfaces we’ve discovered are from Microsoft’s default 802.1X supplicant included by default with Windows XP and later. If you’re still using Windows 2000 machines, you’ll have to download a patch.
If you’re using Mac, Linux, or another OS you’ll have to use a whole other supplicant. There are vendor-specific ones like from Cisco, independent ones such as SecureW2, or Open1X, a multi-platform open source supplicant.
Eric Geier is the CEO of NoWiresSecurity, which offers an outsourced RADIUS/802.1X authentication service to help small and medium sized businesses easily protect their Wi-Fi with enterprise-level encryption. He is also the author of many networking and computing books for brands like For Dummies and Cisco Press.