


In this tutorial, we’ll see exactly how to configure and connect to WPA/WPA2-Enterprise networks in 10.5 Leopard and 10.6 Snow Leopard.
A quick note about the screen shots: they are taken from 10.5; some windows differ in 10.6.
Quickly connecting to an 802.1X network
First, let’s see how easy it is to connect to an 802.1X network without creating a profile.
If the only EAP type enabled by your RADIUS server is TLS, you must first install the client security certificate to Mac OS X. However, the PEAP and TTLS protocols don’t require this client-side certificate.
Now to connect, select the wireless network from the AirPort menu on the top of the desktop as you would with any other network.
If PEAP or TTLS is active, you’ll be prompted to login, as Figure 1 shows. Enter a user name and password. If you want to save your login credentials, so you don’t have to enter them each time you connect, select Remember this network. Then click OK to continue.
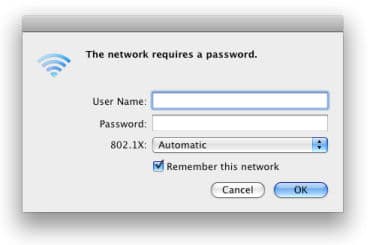
Figure 1
If the RADIUS server’s certificate wasn’t issued by a Certification Authority (CA) automatically trusted by Apple, you’ll be prompted to verify the server’s digital certificate, as Figure 2 shows. Ensure the certificate is for the correct domain and issued by the right CA. So you don’t have to do this every time, you may want to check the always trust option. If everything is valid, click Continue to trust it and connect.
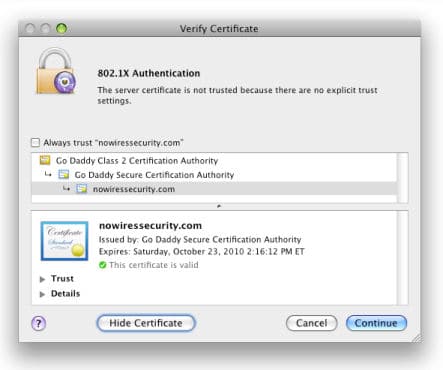
Figure 2
Creating network locations
Mac OS X includes a network location feature where you can apply network settings based upon the location. This is especially beneficial for laptops and if you’re going to create Login Window or System profiles for your 802.1X settings.
You can read more about these profile types in the next section before proceeding. If you are setting up a simple User profile, you might not want to create network locations.
If you need to, here’s how to create a network location:
- Click Apple > System Preferences > Network.
- From the Location drop-down menu on the top, select Edit Location.
- Click the Add (+) button at the bottom of Locations, give it a descriptive name, and then click Done.
Make sure you manually change the network location when moving to another location.
Creating 802.1X profiles
Though connecting to an 802.1X network like we already did can save the login credentials (if you choose to remember the network), creating an 802.1X profile can still provide additional functionality. The profiles can streamline or enhance the login procedure, depending upon the profile you create.
Take a look at the profiles types:
- User Profile:This is the simplest type and should be the default if you don’t know which to choose. You can have multiple user profiles on a computer and they aren’t tied to specific Network Locations. However, you cannot use this profile on domain networks that have a directory service, such as Open Directory or Active Directory.
- Login Window Profile:This profile doesn’t apply to local Mac accounts. It only works with domain networks that have a directory service. Mac OS X uses the same credentials from when the user logs into his or her Mac account to authenticate both to the 802.1X network and to a directory service. You may have multiple Login Window profiles per Network Location, but they supersede any User profiles.
- System Profile: This profile also doesn’t apply to local Mac accounts, only with domain networks. It enables connectivity to the network when no user is logged in to the computer, great when administrators always need network access to the computer. You can only have one instance of this profile type per location, and it supersedes any User and Login Window profiles.
Remember, if you’re using the EAP type TLS, you must first install the client security certificate to Mac OS X.
If you’re creating a Login Window or System profile, you need to first verify you’re connected to the Open Directory or Active Directory server. In 10.5, use the Directory Utility: click Go > Utilities and open the Directory Utility. In 10.6, click System Preferences > Accounts > Login Options.
To get started on creating a profile, bring up the 802.1X settings: click AirPort icon > Open Network Preferences. On the Network window, click the Advanced button, select the 802.1X tab.
In 10.5, select the desired profile type using the Domain drop-down menu.
In 10.6, click the Add (plus sign) button to choose the desired profile type, enter a name for the configuration, and hit Enter.
If you have chosen a User profile (see Figure 3):
- In 10.5, click the Add (plus sign) button, enter a name for the configuration, and hit Enter.
- Enter your User Name and Password, unless you’re using TLS.
- In 10.6, select Always prompt for passwordif you don’t want to save your login credentials.
- Select the network name, from the Wireless Networklist, or enter the SSID of a hidden network.
- Select the desired protocols from the Authentication list box.
- Click OK and then on the Network window, click Apply.
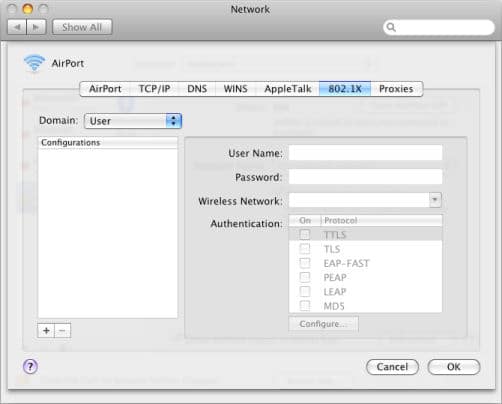
Figure 3
If you’ve selected a Login Window profile (see Figure 4):
- Select the network name, from the Wireless Networklist, or enter the SSID of a hidden network.
- Select the desired protocols from the Authenticationlist box.
- Click the Enable 802.1XLogin button.
- Click OK and then on the Network window, click Apply.
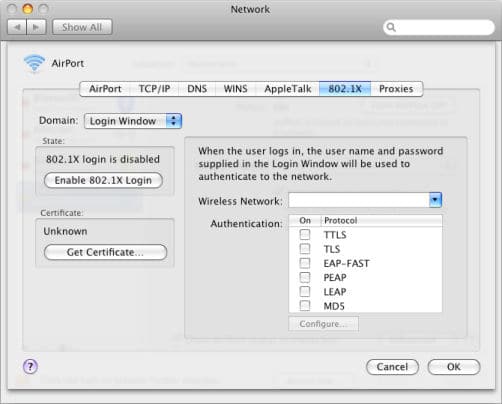
Figure 4
If you ever want to disable this profile, go back to the 802.1X settings and click the Disable 802.1X Login button.
If you’re creating a System profile (see Figure 5):
- Enter your User Name and Password, unless you’re using TLS.
- Select the network name, from the Wireless Network list, or enter the SSIDof a hidden network.
- Select the desired protocols from the Authenticationlist box.
- Click the Enable 802.1Xbutton.
- Click OK and then on the Network window, click Apply.
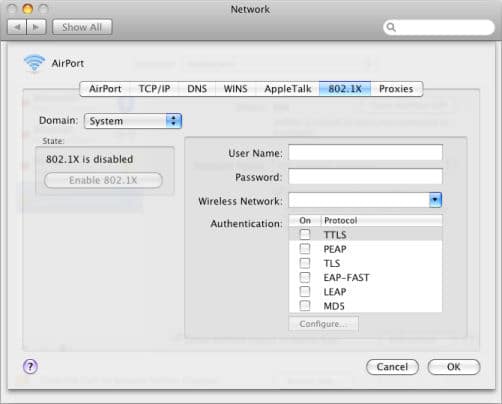
Figure 5
By default, you’ll be prompted to login when connecting to the network, which will automatically save the login credentials. To save them beforehand, you can open the AirPort preferred network entry, enter your login credentials, click Remember this network, and click Add.
If you ever want to disable this profile, go back to the 802.1X settings and click the Disable 802.1X button.
We did it
Now you should understand how to quickly connect to 802.1X networks in Mac OS X and how to create profiles for them. Before I go, here are a few final tips:
- If you’re connecting to a simpler network without a central directory service, you probably don’t even need to create a profile—just connect like we first discussed.
- Keep Mac OS X updated, there have been updates specifically related to how it handles 802.1X authentication.
- The Profile type you use doesn’t change the actual RADIUS attributes and traffic; they are only specific to Mac OS X.
- If you run into problems, be sure to remove any previous preferred networks entries, 802.1X profiles, 802.1X certificates from Keychain (for TLS), and then start over.
Eric Geier founded NoWiresSecurity, which helps small businesses quickly and easily protect their Wi-Fi with enterprise-level security. He’s also a freelance tech writer and author of many networking and computing books, for brands like For Dummies and Cisco Press.
Get more help with wireless security; follow eSecurtyPlanet on Twitter @eSecurityP.