If you’ve implemented WPA or WPA2 Enterprise encryption for your Wi-Fi network, you probably know too well that it isn’t easy to configure the 802.1X settingson clients of a corporate or campus network.
Even setting up Windows computers can be a pain, not to mention Mac OS X or Linux machines. Configuring and supporting mobile devices might just put you over the edge. However, at least Apple (NASDAQ: AAPL) provides full 802.1X support and a nifty configuration utility and scheme for its mobile products.
Here, we’ll explain how to push 802.1X settings to iPhones, iPod touches, and iPads. The following 802.1X authentication methods are supported: PEAP, EAP-TLS, EAP-TTLS, EAP-FAST, EAP-SIM, and LEAP. We’ll a create configuration profile for the Wi-Fi settings and then distribute and install them.
Creating configuration profiles
Apple offers the iPhone Configuration Utility (iPCU) for Windows and Mac OS X to create, encrypt, maintain, and install XML configuration profiles. Despite its name, it can work with the iPod touch and iPad, as well. In addition to Wi-Fi settings, these profiles can contain device security policies, VPN configuration, MS Exchange and email settings, and digital certificates. You can create profiles for specific users, groups, or a profile for all.
First, you should download the iPCU. The Windows edition of iPCU 3.1 is what we’re going to use and is recommended for those managing devices running iOS 4.0 or later. IPCU 2.2is recommended for iOS 3.x and iOS 4.x.
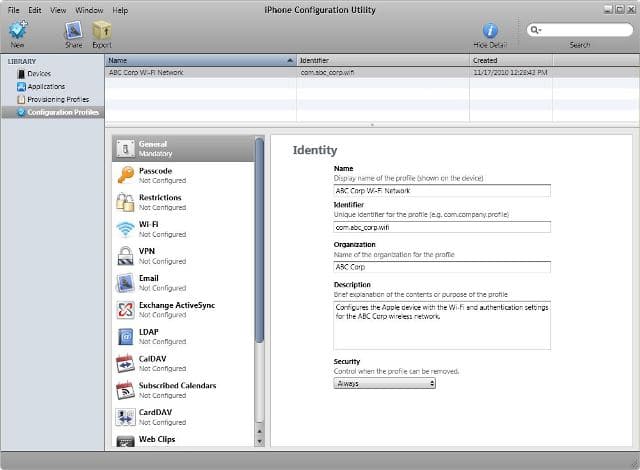
To get started, open iPCU, select Configuration Profiles, and click the New button. Start by entering the General settings. Figure 1 shows an example. Keep in mind, the Identifier should be unique and follow the format: com.companyname.identifier, such as com.abc_corp.wifi. This value is compared to other configuration profiles when installing on devices. If another profile exists with the same Identifier, the profile will be replaced, except any Exchange settings.

Figure 1
Before entering the Wi-Fi settings, you should add the RADIUS server’s CA certificate, and a client certificate if using a protocol like EAP-TLS. Select the Credentials settings and then click the Configurebutton. Select the desired certificate to add it. If you don’t see it, make sure it’s installed onto the computer. You can add additional certificates by clicking the plus sign in the upper right corner of the window.
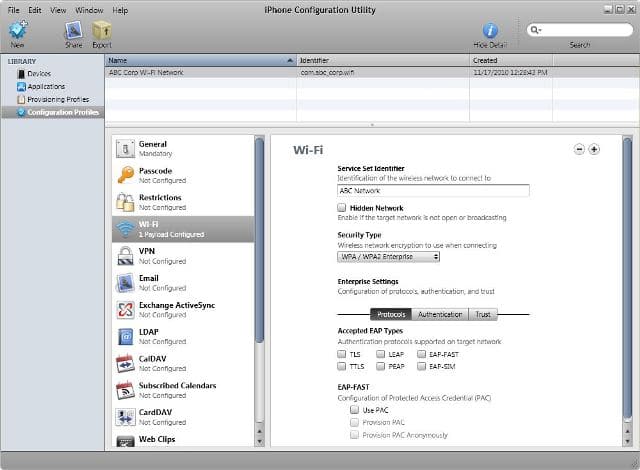
Now you can move to the Wi-Fi settings and click the Configure button. Then set the basic and security settings. Once you select WPA/WPA2 Enterprise for the Security Type, you’ll see the authentication settings, such as Figure 2 shows. If creating the profile for a specific user, you can optionally enter the Username and Password; otherwise leave it blank so the user is prompted for them. If you do enter credentials, you should encrypt the configuration file once you’re done. Be sure to select your RADIUS server’s CA certificate on the Trust tab. For increased security, you should also add a trusted certificate name and uncheck the last option to not all trust exceptions. If a client certificate is required, such as with EAP-TLS, upload an Identify Certificate on the Authentication tab.

Figure 2
If needed, you can add multiple Wi-Fi profiles to the configuration by clicking the plus sign in the upper right corner of the window.
That’s it for the Wi-Fi and 802.1X settings. However, you might want to look into the others. You can require passcodes in order to unlock the device and define passcode requirements. You can impose restrictions, such as blocking explicit content, Safari, YouTube, iTunes Music Store, and camera use. You can also set VPN, email, Exchange, and other network settings.
Distributing and installing the configuration profiles
Once you’re done creating a configuration profile, you can distribute it to users by email or upload to a website. You could even create a separate SSIDon the network with a captive portal pointing to the configuration file so users can quickly and easily download it. You can also connect devices to the computer and install directly using the iPCU.
To email the configuration file using Outlook, click the Share button on the toolbar. To manually distribute the file, click Export.
When sharing or exporting, you must pick a security option. Signing it prevents installation by users if it’s altered. Plus the profile can only be updated by another profile with the same identifier and created by the same copy of iPCU. Choosing the signing and encryption option protects the profile settings (including any passwords) and ties it to a specific device.
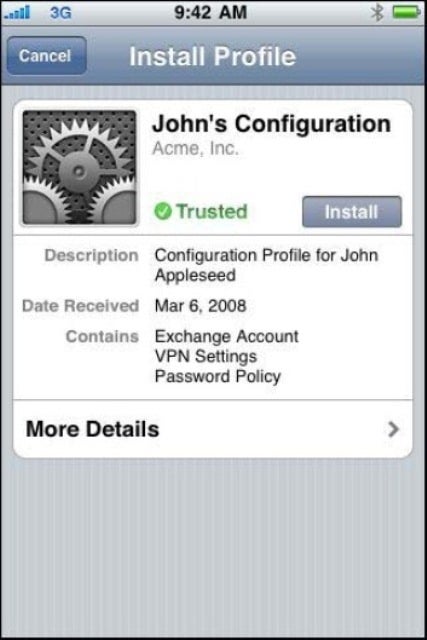
Once shared or exported, you’ll see the configuration profile(s) with the .mobileconfig extension. Give this file to the users via your desired medium. When a user opens or downloads it, they’ll be prompted to start the installation process. Figure 3 shows an example.

Figure 3
Getting more help
We discovered how to use the iPhone Configuration Utility (iPCU) to create configuration profiles for pushing Wi-Fi and 802.1X settings to Apple’s mobile devices. The configuration utility and scheme is quite sophisticated. Refer to the Enterprise Deployment Guide and other resources on Apple’s enterprise support page. You’ll find additional details on Wi-Fi settings and general information on deploying iPhones, iPod touches, and iPad on your network.
Eric Geier founded NoWiresSecurity, which hosts a RADIUS/802.1X service. He’s also a freelance tech writer and author of many networking and computing books, for brands like For Dummies and Cisco Press.
Keep up with security news; follow eSecurityPlanet on Twitter: @eSecurityP.


