


What happens to the confidential data on hard drives and other storage media in your organization when you replace them? It’s a vital question to ask – because unless the data is completely erased, there’s a good chance that it could come back to haunt you. As a quick Google search will confirm, there’s no shortage of stories of valuable data found on hard drives bought second-hand or salvaged from the garbage.
An incident like this can be embarrassing and harm the reputation of your company – and if confidential business information is leaked, it could have serious negative financial consequences. There are also numerous state and federal regulations, as well as specific industry regulations such as the health Insurance Portability and Accountability Act (HIPAA) and the Payment Card Industry Data Security Standard (PCI DSS), which require personal and other information be securely deleted before storage media are discarded or reused.
When Windows “deletes” files, it simply moves those files to the recycle bin so that they can be easily retrieved. Even if you bypass or empty the recycle bin, the data is not physically deleted: The space on the disk where the data is stored is marked as available for reuse, but the old data will remain there until the space is reclaimed to store new information. Files that have been deleted and not yet overwritten can easily be “undeleted” using freely available undelete utilities such as Recuva.
The National Institute of Standards and Technology’s Guidelines for Media Sanitization (PDF; NIST Special Publication 800-88) recommends three different ways to “sanitize” a hard drive:
Clearing: Overwriting the entire drive with new data so that the old data is no longer readable by a computer, although it may be possible to retrieve some data in a laboratory using signal processing equipment and specially trained personnel.
Purging: Removing the data at a more fundamental level, either using the drive’s own controller electronics to carry out the task, or by degaussing (placing the drive in a machine that generates a strong magnetic field). Purging should remove all traces of data so that it is impossible to recover even if the storage medium is analysed in a laboratory.
Destroying: Physical destruction can be accomplished using a variety of methods, including disintegration, incineration, pulverizing, shredding, and melting.
Let’s take a look at each of these methods in turn.
Method # 1: Clearing Data from Your Drive
Overwriting the entire contents of a drive with 0s, 1s, or random data is a technique used to make the original contents unreadable. To be sure that this is as effective as possible, some agencies recommend overwriting multiple times, using 1s, then 0s, and then random data – but recent research suggests that a single overwrite is in fact sufficient. The de facto standard for overwriting data on a hard drive is an open source program called Darik’s Boot and Nuke.
How to clear data from your hard disk drive using Darik’s Boot and Nuke (DBAN):
- To use DBAN you first need to download the ISO image and burn it to a CD to make a DBAN boot CD.
- Next, connect any drives you want to clear to a PC, and boot the PC from the CD
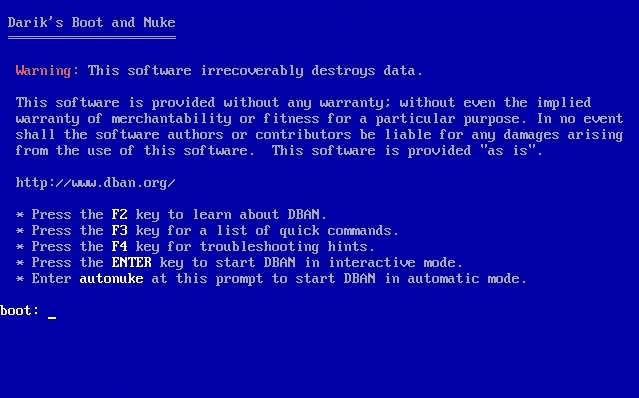
- At the boot: prompt, type the command autonuke. This will overwrite all drives connected to the computer. Alternatively, press Enter at the boot: prompt to select specific drives to clear, and options including the number of times you want each drive to be overwritten.
Note: You can also boot DBAN from a USB drive. To make a DBAN bootable USB drive follow the instructions at Pendrivelinux, selecting DBAN 2.2.6 as your Linux distribution.
DBAN provides an easy way to clear all the disks on a PC before disposal of the PC, or to create a “sanitizing station” used to clear drives connected to it before the drives are disposed of.
Important Note: Clearing data from a disk using DBAN is not an ideal solution in all cases. DBAN can take hours or even days to run, especially if multiple overwriting is selected. Furthermore, DBAN is unable to work on damaged drives or sectors, or to overwrite sectors that have been detected as bad and swapped out of service. For this second reason alone, clearing is only suitable for disks that contain no sensitive information. Disks with sensitive information should be purged or destroyed.
Method # 2: Purging Data from Your Drive
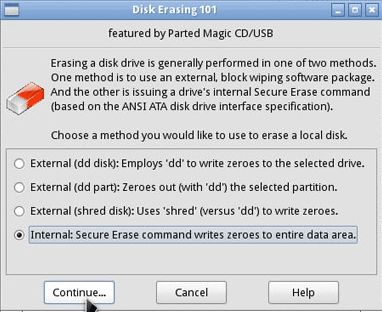
The easiest way to purge a drive – either a conventional spinning SATA or PATA hard drive or SSD drive – is to use the Secure Erase command built in to the firmware of any ATA drive made in the last 10 years or so. To invoke the command you need to use a program that can interact with the firmware, such as the open source Parted Magic.
How to use Parted Magic:
- Download the Parted Magic ISO file from SoureForge and burn it to a CD or create a bootable Parted Magic USB stick by following the instructions at Pendrivelinux.
- Start your computer from the CD or USB drive, and once Parted Magic boots, select option 1 to run using default settings.
- At the bottom of the screen, choose System Tools – Erase Disk
- Select the final option to use Secure Erase
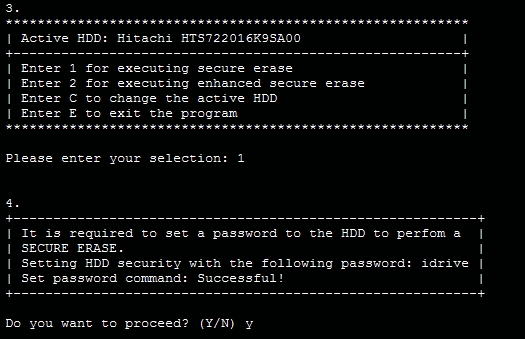
Secure Erase can also be invoked using a DOS-based utility called HDDErase, which you can download from the Center for Magnetic Recording Research.
How to use HDDErase:
- Copy hdderase.exe onto bootable DOS floppy disk, CD, DVD or USB stick and boot the system which has the drive you want to purge
- Type “hdderase” at the DOS prompt to run HDDerase.exe.
- At the prompt, select the drive you want to purge
- Type “y” to proceed to the options menu
- Select secure erase (or enhanced secure erase if it is available)
- Type “y” to proceed with the secure erase.
Hardware options for purging data:
If you are planning on purging a large number of disks, you may find it more convenient to use a hardware device into which you plug one or more disks. These have the advantages of not tying up a PC, and some can create printable certificates that data has been purged for audit purposes.
Drive eRazer Ultra ($249). This small device can purge one drive at a time using Secure Erase.
Aleratec Sanitizer ($1,049). This unit can purge up to 6 drives at a time using Secure Erase.
Digital Shredder (approx. $10,000). This industrial-strength unit can purge up to three drives at a time using Secure Erase.
Purging data by degaussing:
A degausser creates a strong magnetic field. When any magnetic media such as a hard disk drive, floppy disk, magnetic tape, or Zip drive is inserted and the machine activated, the media are completely erased and rendered permanently inoperable in a matter of a few seconds. Degaussers typically cost about $20,000 and can also be rented for short periods.
One problem with degaussing is that as the data on magnetic disks become more densely packed to produce higher capacity disks, the magnetic coercivity (the magnetic fields needed to write or delete bits on the disks) rises in value. That means that older degaussers may not be powerful enough to delete newer disks. Technology such as thermally assisted magnetic recording (TAMR), which uses lasers to heat disks as they are written to momentarily reduce their magnetic coercivity, may make degaussing impossible in the future.
Another perhaps more fundamental problem with degaussing is that it only works on magnetic media, and can’t be used on solid state drives. It is important to remember that hybrid drives that include a solid state write cache or an element of permanent storage as well as traditional magnetic disks are becoming increasingly common, and attempting to degauss a hybrid drive would result in unerased data on the solid state portion.
Method # 3: Physically Destroying Your Drive
Destroying a storage medium ensures that its data is unreadable. Typically this is carried out at an outsourced metal destruction or incineration facility with specific capabilities to perform these activities effectively, securely, and safely. Paper shredders can also be used to destroy media such as CDs and floppy disks once they have been removed from their containers.
Surprisingly, damaging disks by bending the platters by as little as a few millimeters has been found to destroy the disks beyond any form of practical data recovery – even though the data is still intact on them.
Happy deleting!
Paul Rubens is an award-winning technology journalist who has been covering IT security for over 20 years. He has written for leading international publications including The Economist, The Times, The Financial Times, The Guardian, the BBC, and Computing.